

Pattern Making Tips
Pattern making is the foundation of well-fitted garments. Whether you’re adjusting a commercial pattern or drafting your own from scratch, understanding the basics will help you achieve a custom fit and bring your designs to life. In this mini guide, we break down essential tools, techniques, and expert tips for beginners.
Pattern Making 101
〰️
Pattern Making 101 〰️
What is Pattern Making and Why Is It Important?
Pattern making is the blueprint of garment construction. It allows you to create custom-fitted clothing tailored to specific body measurments rather than relying on standard sizes. Mastering pattern making gives you the freedom to modify designs, perfect the fit, anad bring your creative visions to life.

Ok... Lets Talk About Tools You Need to Get Started
A well equipped pattern making kit ensures accuracy and effiency. Here are some of our reccomeneded essentials:
- Measuring tape- for precise body measurments
- Pattern paper or muslin- to draft and test your designs
- Tracing wheel and carbon paper- for trasferring markings.
- French curve & hip curve rulers- for smooth lines and shaping
- Sharp fabric scissors & rotary cutter- for clean pattern cuts ****(Use these tools on fabric only!! Never use them to cut paper as this wears on the shears and your cuts will not be as sharp.)
- Needles- You will need needles in at least two sizes: No.5 Betweens, the larger size, are 1 1/2 in. long and are used mainly for basting, sewing buttons, and other owrk requiring coarse thread. No 6. Betweens, the smaller size are 1 3/8in. long and are used in all hand sewin.
- Tailors Chalk- Used to mark on cloth and differes from ordinary chalk in the ease in which it can be brushed off.
- A tailors square- If you plan to draft your own patterns.
- An iron- Any household iron can do, but it is best to have a tailor's iron with three heats -- low, medisum, and hot.
Having the right tools can make pattern making much easier, so invest in quality supplies early on!
Last thing.
Lets get a better understanding of taking accurate body measurents.
Taking proper measurements is the key to a well-fitting pattern. Follow these steps:

Wear
fitted clothing or under garments to get precise numbers.
(Photo from a fitting. May add a fun fact/ cheat code tip here)
Master Tailor, Wilton Terry, introduces himself.

2. Keep
the measuring tape snug but not tight.
(Close up photo of measuring tape. Different shots of measurements. Show all measurements needed for pants/shorts, tops, dresses)

3. Measure
the bust, waist, hip, shoulder width, sleeve length, and inseam accurately.
Tip: If you’re making a custom pattern, take a few extra measurements like the back length and armhole depth to refine the fit.
Pro Tip: Practice your math skills. You should be able to:
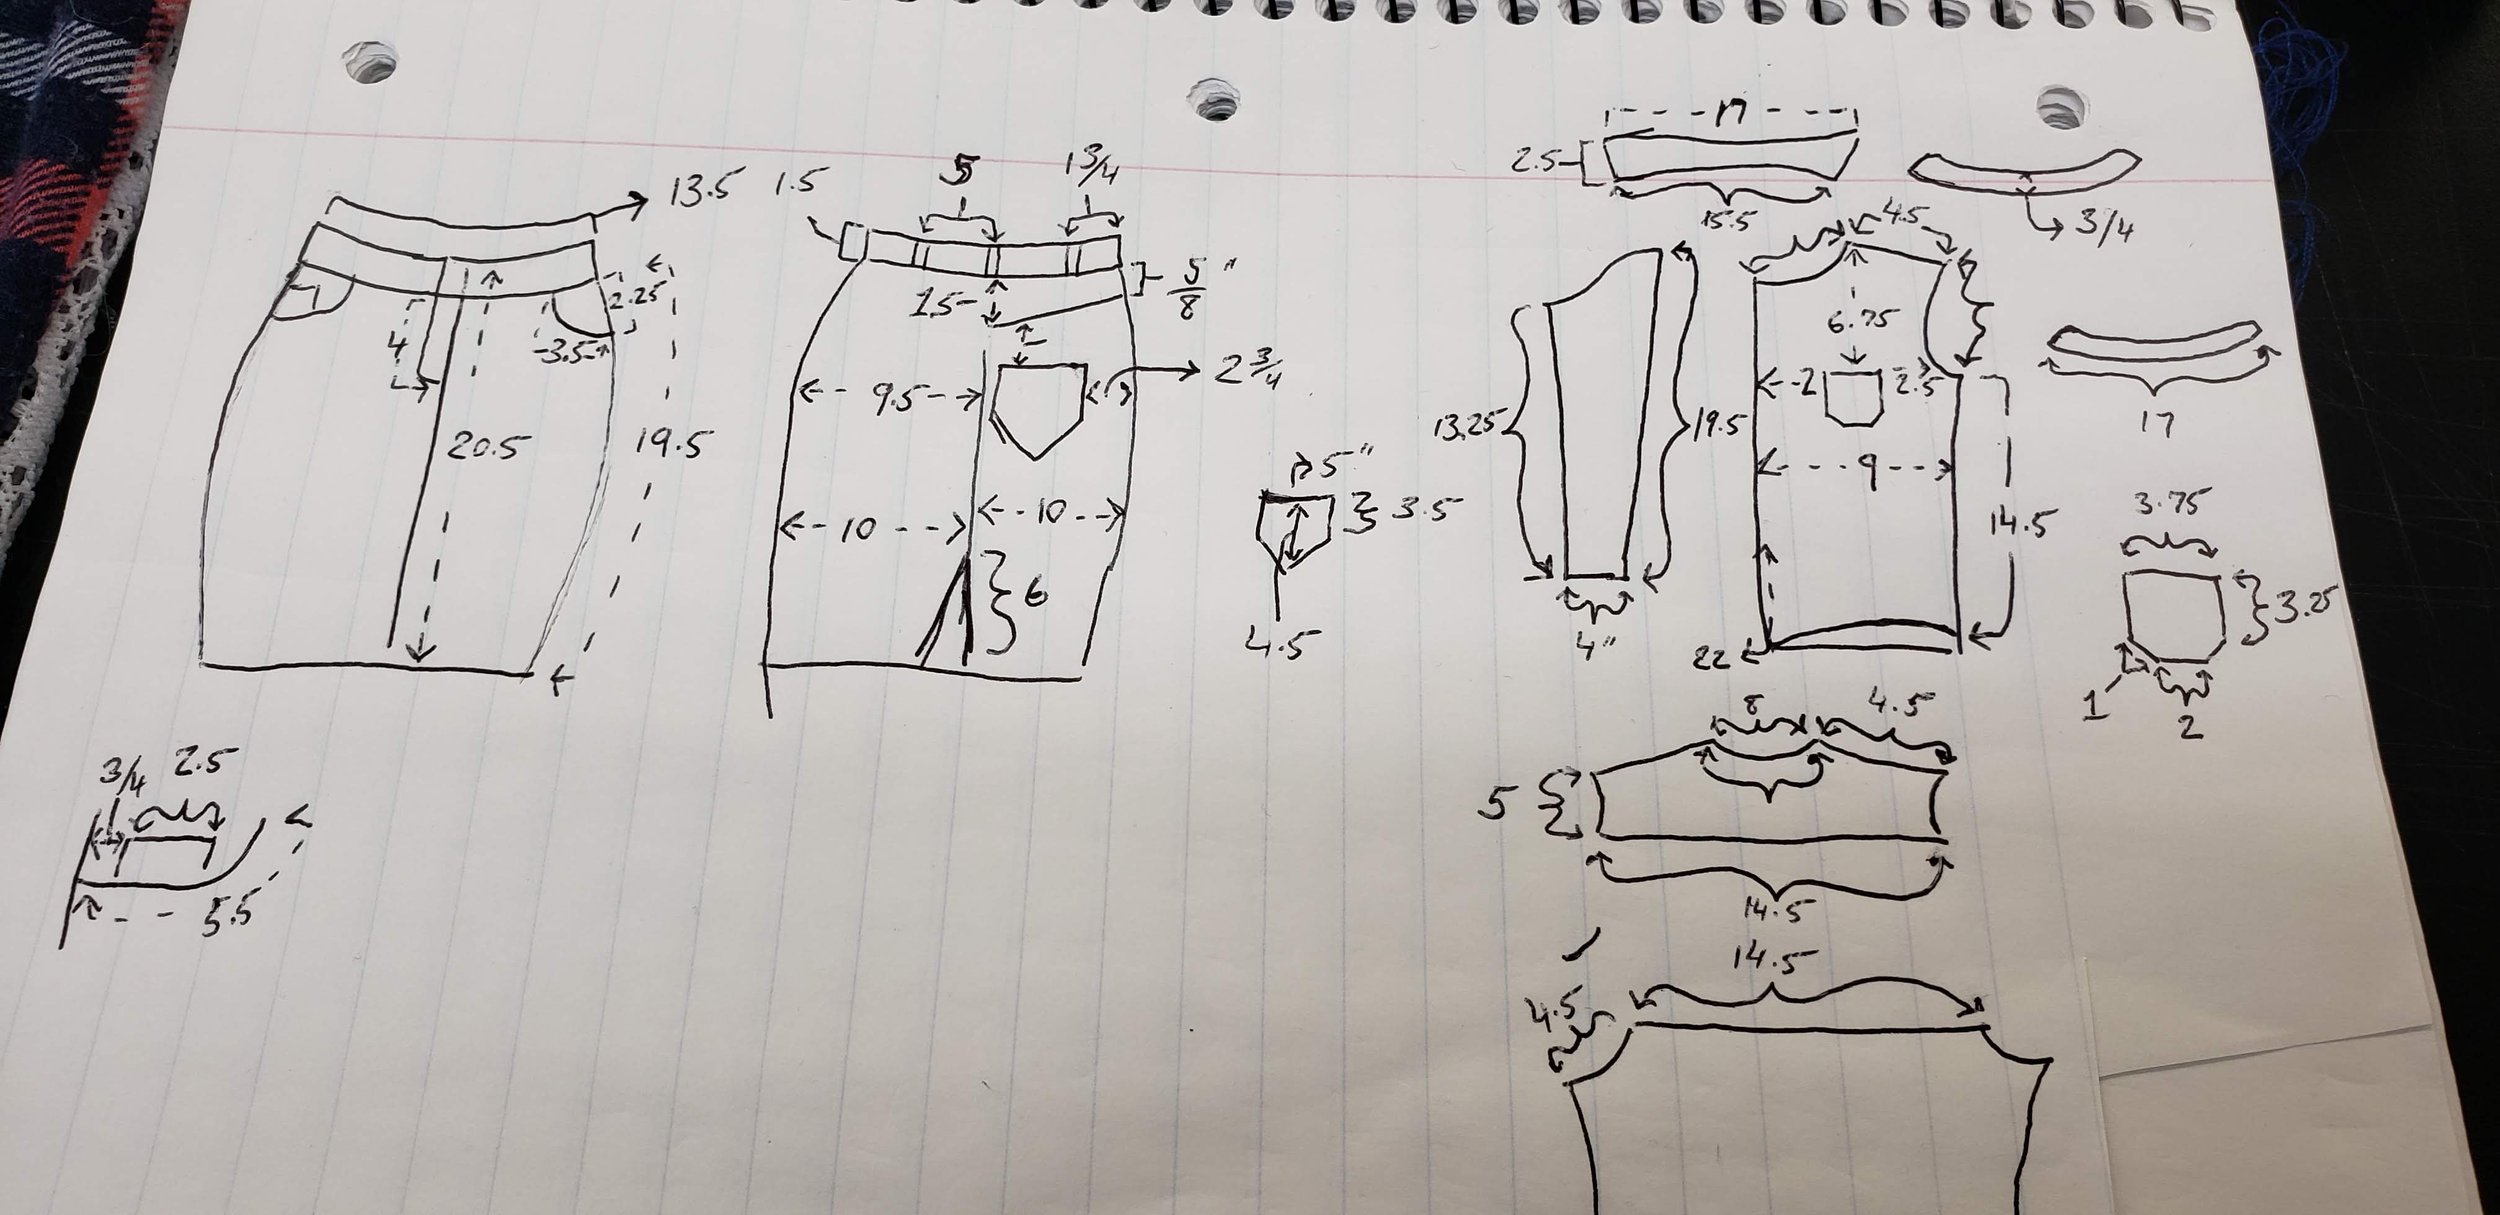
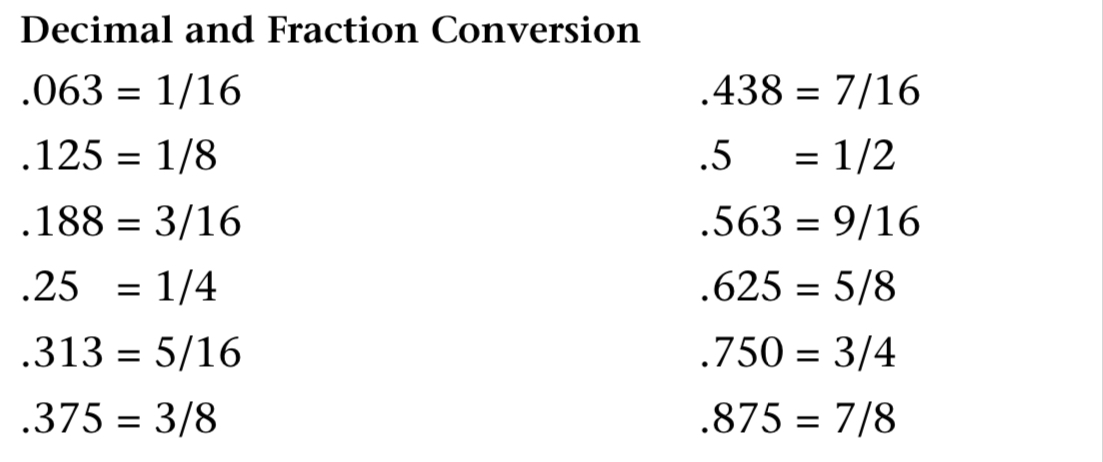
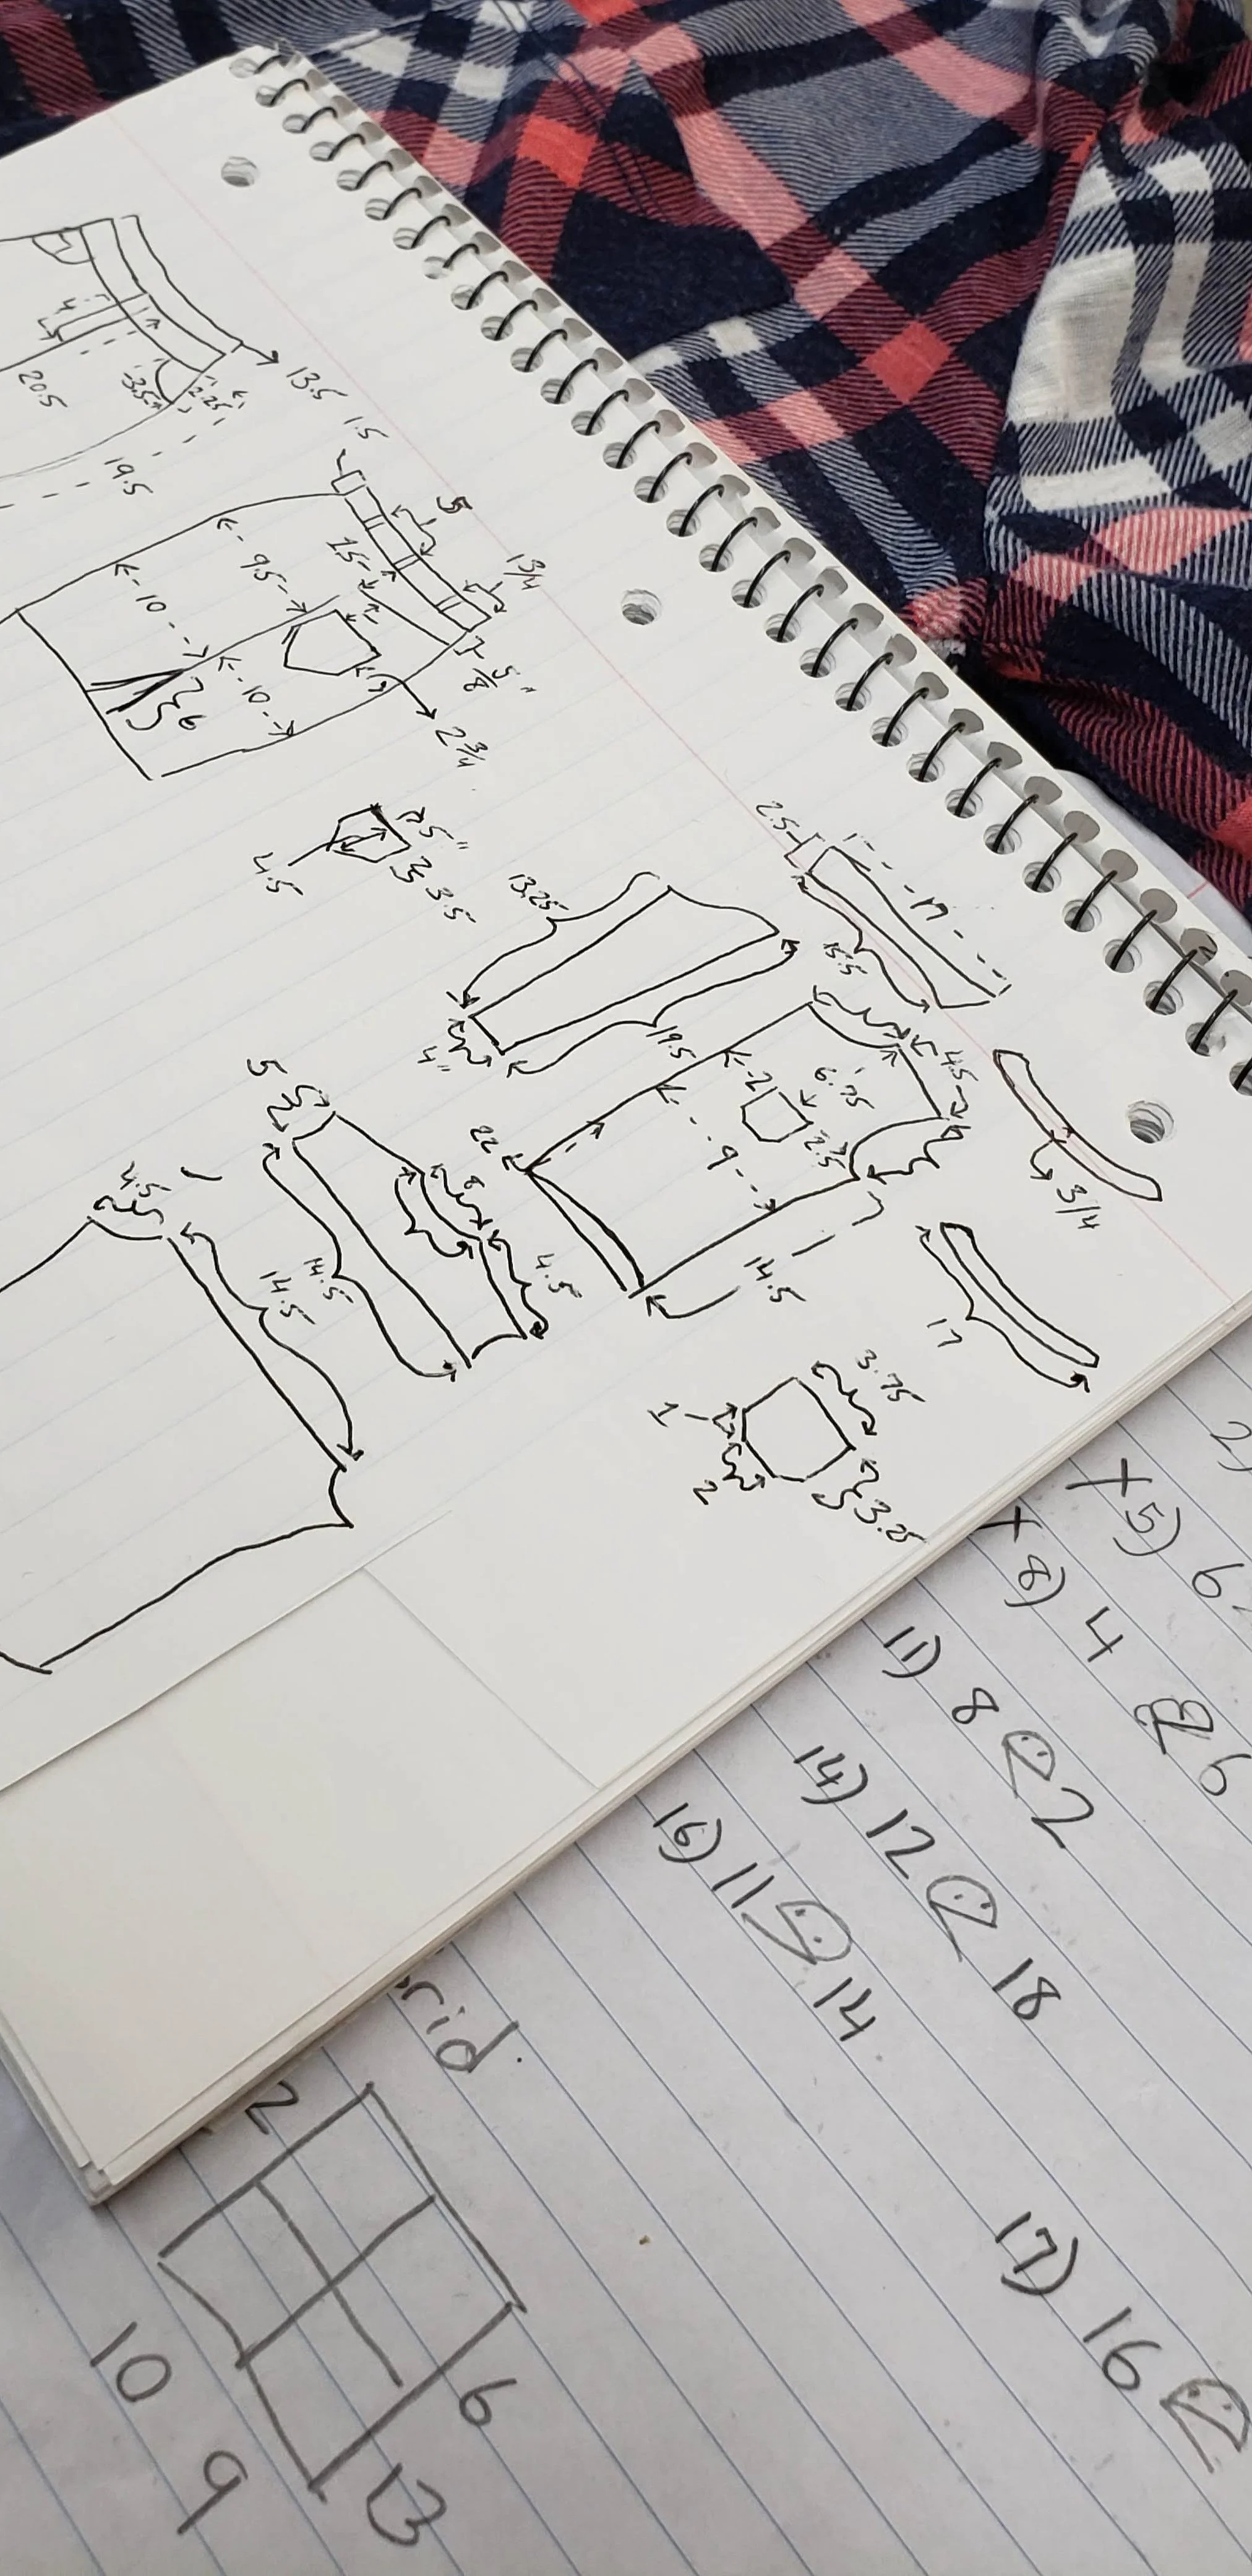
Take and record measurements to the exact 1/16 inch.
Compute yardage for single and mass production (if selling merchandise).
Apply math instructions from a worksheet to project in development.
** We recommend googling math worksheets targeted to finding the common denominator, and measuring the distance between variables on a ruler**
4. Record
measurements in inches. You can also take measurements in centimeters. This is more ideal when drafting patterns or making samples for customers overseas. One of the most important things while learning the basics is understanding ruler measurements. The three primary measurements you will begin working with are:
1/16th- Normally, these are the smallest measurements we use on the ruler.
1/4th- When drafting patterns, you will base your scale on quarter measurements. For example, if a waist measures 28 inches, you will ideally divide it into four equal parts. 7 inches each (since 4 is your divider for quarters.)
1/8th- When scaling measurements up or down, ideally you will scale on paper or digitally based on 1/8ths measurements.
Keep in mind,
Body proportions vary, meaning these divisions won’t always be equal. Someone with a larger posterior area and a flatter stomach will require more material in the back than the front. Similarly, differences in bust and back proportions affect how measurements are distributed.
To adjust for this, think of the body being divided vertically down the center to create two halves. Then divide each half again to form four sections, adjusting each based on the individual’s proportions rather than using equal quarters.
Remember, these are just the basics and barely scratch the surface of all the knowledge to be learned.
Let’s discuss some common mistakes & how to avoid them
Even experienced designers make mistakes! Be prepared to fail and take them as learning experiences.
Skipping seam allowances- Always add the correct seam allowance before cutting the fabric. You garment will be smaller than anticipated if you do not account for it.
Ignoring fabric grainlines- Cutting off-grain can distort the final fit of your garment. When using textiles or fabrics, most materials have grain patterns that will either be length grain or cross grains. You want to have the cut centered as it gives you the natural grain of the material.
Not testing the pattern first- Always make a sample garment before cutting into expensive fabric.
By avoiding these mistakes, your patterns will lead to professional-looking, well-fitted garments!
Share your beginner projects with us!
Tag us on TikTok: @OakMasterTailors
Tag us on Instagram: @FashionForwardGroup or @OakMasterTailors
Still have more questions?
Submit your questions on our FAQ page or contact us!